Recently in one of our project the requirement is to insert element within existing XML which is a column(XML Data type) in a table. In other words we have to insert dynamic xml in another xml. I hear the similar requirement in most of the forums...
We can use one of the XML DML operation "INSERT" - Inserts one or more nodes identified by Expression1 as child nodes or siblings of the node identified by Expression2.
Using this Insert operation we can insert only a static nodes as shown below:
-- Declare Local Variables
DECLARE @MainXML XML
DECLARE @NewXML XML
-- Sample XML with employee information
SET @MainXML = '<employees>
<employee>
<fname>John</fname>
<lname>V</lname>
<desig>SSE</desig>
</employee>
<employee>
<fname>Pascal</fname>
<lname>J</lname>
<desig>SE</desig>
</employee>
<employee>
<fname>Naveen</fname>
<lname>M</lname>
<desig>Engineer</desig>
</employee>
</employees>'
-- Inserting static xml
SET @MainXML.modify('insert (<employee><fname>Test</fname></employee>) as last into (/employees)[1]')
-- To verify the reault
select @MainXML
Now if we want to insert an XML which is available within the local variable @NewXML:
-- Assigning the sample xml to the local variable
SET @NewXML = '<employee><fname>Test</fname></employee>'
Now if we try to insert this xml from the local variable using sql:variable:
SET @MainXML.modify(' insert {sql:variable("@NewXML")} as last into (/employees)[1]')
We will get an error message indicating:
XQuery [modify()]: An expression was expected
In SQL Server 2005 the work around will be:
1. Dynamic Query
2. Combination of the XML DML Operations
Here I am not concentrating on the Dynamic Query approach as it is pretty simple to implement and it may not be a best approach when compared to other.
Following set of queries using DML operation, we can insert XML data from a local variable:
-- Appending both the Main XML and New XML to insert into Main XML with a root node
SET @MainXML = '<root>' + CAST(@MainXML AS VARCHAR(MAX)) + '<new>' + CAST(@NewXML AS VARCHAR(MAX)) + '</new>' + '</root>'
-- Moving employee element from new element to main xml as part of employees element
SET @MainXML.modify(' insert (//new/employee) as last into (/employees)[1]')
-- Deleting the new element
SET @MainXML.modify(' delete (//new)')
-- Steps to move employee element to the end and to delete the root element
SET @MainXML.modify(' insert (//root/employees) after (/root)[1] ')
SET @MainXML.modify(' delete (/root)')
-- Selecting the xml for final verification
SELECT @MainXML
In Summary following is the sample Script in SQL Server 2005 to insert a dynamic XML into another XML:
DECLARE @MainXML XML
DECLARE @NewXML XML
SET @MainXML = '<employees>
<employee>
<fname>John</fname>
<lname>V</lname>
<desig>SSE</desig>
</employee>
<employee>
<fname>Pascal</fname>
<lname>J</lname>
<desig>SE</desig>
</employee>
<employee>
<fname>Naveen</fname>
<lname>M</lname>
<desig>Engineer</desig>
</employee>
</employees>'
SET @NewXML = '<employee><fname>Test</fname></employee>'
SET @MainXML = '<root>' + CAST(@MainXML AS VARCHAR(MAX)) + '<new>' + CAST(@NewXML AS VARCHAR(MAX)) + '</new>' + '</root>'
SET @MainXML.modify(' insert (//new/employee) as last into (/employees)[1]')
SET @MainXML.modify(' delete (//new)')
SET @MainXML.modify(' insert (//root/employees) after (/root)[1] ')
SET @MainXML.modify(' delete (/root)')
SELECT @MainXML
These many steps are not required for SQL Server 2008 as it supports to insert the dynamic XML directly into another XML. Following is the sample script for SQL Server 2008:
DECLARE @MainXML XML
DECLARE @NewXML XML
SET @MainXML = '<employees>
<employee>
<fname>John</fname>
<lname>V</lname>
<desig>SSE</desig>
</employee>
<employee>
<fname>Pascal</fname>
<lname>J</lname>
<desig>SE</desig>
</employee>
<employee>
<fname>Naveen</fname>
<lname>M</lname>
<desig>Engineer</desig>
</employee>
</employees>'
SET @NewXML = '<employee><fname>Test</fname></employee>'
-- One statement in SQL Server 2008 to do all the operation what we mentioned above for SQL Server 2005
SET @MainXML.modify(' insert {sql:variable("@NewXML")} as last into (/employees)[1]')
select @MainXML
This we implemented in most of our applications, hope it will be useful to most of the folks...
Tuesday, August 18, 2009
Thursday, August 13, 2009
An Introduction to Infopath 2010 - Part-3 - Creating Cascading Dropdowns
In continuation to my previous posts
An Introduction to Infopath 2010 - Part-1 - An Overview
An Introduction to Infopath 2010 - Part-2 - Creating Basic Forms
In this post we will see how easily we can create Cascading Dropdown controls in Infopath 2010 Desinger tool.
Most of the times in our applications Cascading Dropdown (When there is change event for one of the combo box should reflect the values in another combo box. For example when we change the Country in the country Combobox, then the states should reflect in the State Combobox for the selected country) is a common requirement. Right now in SharePoint we are achieving this requirement by using JavaScript or a JQuery.
Infopath 2010 made our job more easy by providing this functionality out-of-the-box. Now we will see a sample for creating a form to demonstrate the Cascading Dropdown functionality.
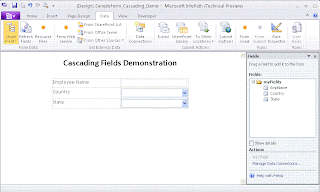
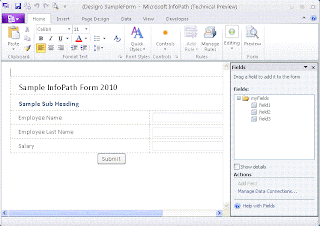
Step-1: Creating a Sample Form
Create a sample form as shown in the following picture with two dropdown list controls for Country and State.
Step-2: Creating an XML file
For this example we are considering xml as a data source. Following is the xml format for storing the Country and State data:
<?xml version="1.0" encoding="UTF-8"?>
<root>
<country displaytext="India" displayvalue="India">
<state displaytext="Karnataka" displayvalue="Karnataka"/>
<state displaytext="Andhra" displayvalue="AP"/>
<state displaytext="Maharastra" displayvalue="Mumbai"/>
</country>
<country displaytext="US" displayvalue="US">
<state displaytext="Alabama" displayvalue="1"/>
<state displaytext="Alaska" displayvalue="2"/>
<state displaytext="Arizona" displayvalue="3"/>
<state displaytext="Arkansas" displayvalue="4"/>
<state displaytext="California" displayvalue="5"/>
<state displaytext="Colorado" displayvalue="6"/>
<state displaytext="Connecticut" displayvalue="7"/>
<state displaytext="Delaware" displayvalue="8"/>
<state displaytext="Dist Columbia" displayvalue="9"/>
<state displaytext="Florida" displayvalue="10"/>
<state displaytext="Georgia" displayvalue="11"/>
<state displaytext="Hawaii" displayvalue="12"/>
<state displaytext="Idaho" displayvalue="13"/>
</country>
<country displaytext="China" displayvalue="China">
<state displaytext="Anhui" displayvalue="1"/>
<state displaytext="Beijing" displayvalue="2"/>
<state displaytext="Fujian" displayvalue="3"/>
<state displaytext="Gansu" displayvalue="4"/>
</country>
</root>
Save this xml content in a file and name the file as "Country_State_List.xml"
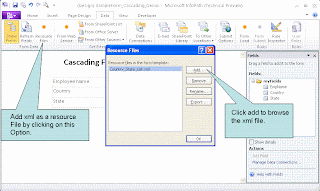
Step-3: Adding XML as Resource File to Infopath form
Now we will add the file what we created in the Step-2 as a resource file to Infopath form. To add a resource file, Select Data -> Resourse Files as shown in the picture:
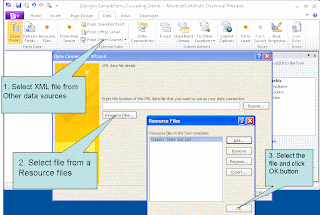
Step-4: Creating Data Source
Now we will create a new data source, in our case data source is an xml file which is available as a resource file. To add a data source, Select Data -> From Other Source -> From XML file. While selecting XML file, we have to select it from the Resource Files. Following picture shows the steps to follow:
After this step, a data connection with the name is available in the form as shown below. This is just a verify the data connection.

If the new data connection is not available as show in the picture, please follow the above steps again.
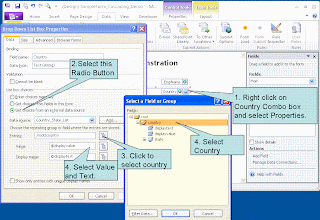
Step-5: Mapping Data Source to Field Controls
Final step is to map the data source to the corresponding combobox (Country and State).
Map the Country Combobox as shown in the following image:
Similarly Map the State Combobox as shown in the following image:
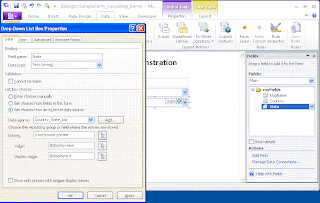
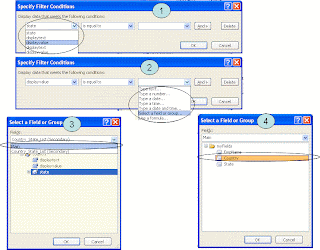
Finally we have to add the filter for the State Combobox to display only the States Associated to the select Country in the Country Combobox. Following image shows how to add the filter (with a black circle on the field):
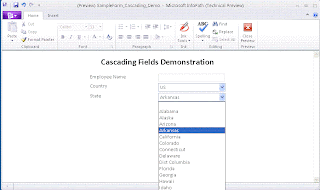
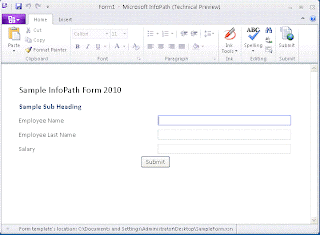
yup, we are done with the cascading dropdowns setup with a xml datasource. Now we can preview the form by selecting Home -> Preview tab. Following image shows the preview of the same:
Please note that we can use same sample for any other data source like MS-Access, SQL Server or Web Service.
An Introduction to Infopath 2010 - Part-1 - An Overview
An Introduction to Infopath 2010 - Part-2 - Creating Basic Forms
In this post we will see how easily we can create Cascading Dropdown controls in Infopath 2010 Desinger tool.
Most of the times in our applications Cascading Dropdown (When there is change event for one of the combo box should reflect the values in another combo box. For example when we change the Country in the country Combobox, then the states should reflect in the State Combobox for the selected country) is a common requirement. Right now in SharePoint we are achieving this requirement by using JavaScript or a JQuery.
Infopath 2010 made our job more easy by providing this functionality out-of-the-box. Now we will see a sample for creating a form to demonstrate the Cascading Dropdown functionality.
Step-1: Creating a Sample Form
Create a sample form as shown in the following picture with two dropdown list controls for Country and State.

Step-2: Creating an XML file
For this example we are considering xml as a data source. Following is the xml format for storing the Country and State data:
<?xml version="1.0" encoding="UTF-8"?>
<root>
<country displaytext="India" displayvalue="India">
<state displaytext="Karnataka" displayvalue="Karnataka"/>
<state displaytext="Andhra" displayvalue="AP"/>
<state displaytext="Maharastra" displayvalue="Mumbai"/>
</country>
<country displaytext="US" displayvalue="US">
<state displaytext="Alabama" displayvalue="1"/>
<state displaytext="Alaska" displayvalue="2"/>
<state displaytext="Arizona" displayvalue="3"/>
<state displaytext="Arkansas" displayvalue="4"/>
<state displaytext="California" displayvalue="5"/>
<state displaytext="Colorado" displayvalue="6"/>
<state displaytext="Connecticut" displayvalue="7"/>
<state displaytext="Delaware" displayvalue="8"/>
<state displaytext="Dist Columbia" displayvalue="9"/>
<state displaytext="Florida" displayvalue="10"/>
<state displaytext="Georgia" displayvalue="11"/>
<state displaytext="Hawaii" displayvalue="12"/>
<state displaytext="Idaho" displayvalue="13"/>
</country>
<country displaytext="China" displayvalue="China">
<state displaytext="Anhui" displayvalue="1"/>
<state displaytext="Beijing" displayvalue="2"/>
<state displaytext="Fujian" displayvalue="3"/>
<state displaytext="Gansu" displayvalue="4"/>
</country>
</root>
Save this xml content in a file and name the file as "Country_State_List.xml"
Step-3: Adding XML as Resource File to Infopath form
Now we will add the file what we created in the Step-2 as a resource file to Infopath form. To add a resource file, Select Data -> Resourse Files as shown in the picture:

Step-4: Creating Data Source
Now we will create a new data source, in our case data source is an xml file which is available as a resource file. To add a data source, Select Data -> From Other Source -> From XML file. While selecting XML file, we have to select it from the Resource Files. Following picture shows the steps to follow:

After this step, a data connection with the name is available in the form as shown below. This is just a verify the data connection.

If the new data connection is not available as show in the picture, please follow the above steps again.
Step-5: Mapping Data Source to Field Controls
Final step is to map the data source to the corresponding combobox (Country and State).
Map the Country Combobox as shown in the following image:

Similarly Map the State Combobox as shown in the following image:

Finally we have to add the filter for the State Combobox to display only the States Associated to the select Country in the Country Combobox. Following image shows how to add the filter (with a black circle on the field):

yup, we are done with the cascading dropdowns setup with a xml datasource. Now we can preview the form by selecting Home -> Preview tab. Following image shows the preview of the same:

Please note that we can use same sample for any other data source like MS-Access, SQL Server or Web Service.
Wednesday, August 12, 2009
An Introduction to Infopath 2010 - Part-2
In continuation to the previous post - An Introduction to Infopath 2010 - Part-1, this post explains on how we can create/design a basic forms using InfoPath 2010.
To design an InfoPath form we will be using InfoPath Designer 2010.
Designer comes with a set of predefined templates for easy-to designing the forms. All these templates are grouped into different buckets like Popular Form Templates, Advanced Form Templates, InfoPath 2007 Form Templates, Template Parts.
Following screen shot shows the set of templates available in the designer:

This window in the office terms is called as Office Out Space, which allows us to open an existing forms, close the form or even to print a form. All the office 2010 applications contains Out Space to perform these operations with an additional tab for setting the options within that application (which can be Infopath/Excel/Word/PowerPoint etc).
Following table provides the set of templates available with the designer with the brief description about their usage:
Popular Form Templates
SharePoint List
Template used to view and edit items in the existing SharePoint List.
SharePoint Document Library
Template to collect and save the data in a SharePoint Document Library.
Blank
A Blank template for designing the form. It can be used for the browser enabled forms.
E-mail
Teamplate for designing the email submitted forms.
Blank (InfoPath Editor)
A Blank template for designing the form and it can be used only with the InfoPath editor while submiting the form.
Advanced Form Templates
Database
Template to design a form to collect data from databases like MS-Access, SQL Server.
Web Service
Template to design a form for query data from a Web Service and even to submit to a Web Service.
XML or Schema
Template to design a form based on an xml file or an a schema file.
Data Connection File
Template to design a form to query a SharePoint Data Source which is defined in a Data Connection File.
Convert Word or Excel Form
Template to design a form based on Microsoft Word document or Microsoft Excel.
Document Information Panel
Form used to edit the properties of the documents stored in a Document Library.
InfoPath 2007 Form Templates
These templates are for the InfoPath 2007.
Blank
A Blank template for designing the form. It can be used for the browser enabled forms.
Blank (InfoPath Editor)
A Blank template for designing the form and it can be used only with the InfoPath editor while submiting the form.
Template Parts
These templates are used to design a template part that can be reused in multiple forms.
Blank
XML or Schema
We will start with the Blank Template from the Popular Form Templates category to create a simple form.

In the coming posts we will see how we can add the validation rules and different submit options to the form.
To design an InfoPath form we will be using InfoPath Designer 2010.

Designer comes with a set of predefined templates for easy-to designing the forms. All these templates are grouped into different buckets like Popular Form Templates, Advanced Form Templates, InfoPath 2007 Form Templates, Template Parts.
Following screen shot shows the set of templates available in the designer:

This window in the office terms is called as Office Out Space, which allows us to open an existing forms, close the form or even to print a form. All the office 2010 applications contains Out Space to perform these operations with an additional tab for setting the options within that application (which can be Infopath/Excel/Word/PowerPoint etc).
Following table provides the set of templates available with the designer with the brief description about their usage:
Popular Form Templates
Template used to view and edit items in the existing SharePoint List.
Template to collect and save the data in a SharePoint Document Library.
A Blank template for designing the form. It can be used for the browser enabled forms.
Teamplate for designing the email submitted forms.
A Blank template for designing the form and it can be used only with the InfoPath editor while submiting the form.
Advanced Form Templates
Template to design a form to collect data from databases like MS-Access, SQL Server.
Template to design a form for query data from a Web Service and even to submit to a Web Service.
Template to design a form based on an xml file or an a schema file.
Template to design a form to query a SharePoint Data Source which is defined in a Data Connection File.
Template to design a form based on Microsoft Word document or Microsoft Excel.
Form used to edit the properties of the documents stored in a Document Library.
InfoPath 2007 Form Templates
These templates are for the InfoPath 2007.
A Blank template for designing the form. It can be used for the browser enabled forms.
A Blank template for designing the form and it can be used only with the InfoPath editor while submiting the form.
Template Parts
These templates are used to design a template part that can be reused in multiple forms.
We will start with the Blank Template from the Popular Form Templates category to create a simple form.

In the coming posts we will see how we can add the validation rules and different submit options to the form.
Tuesday, August 11, 2009
An Introduction to Infopath 2010 - Part-I
I will be posting set of articles covering the features of Infopath 2010 and how it is different from Infopath 2007 which is completely based on the Technical Preview release.
In this post I will be providing a quick overview on InfoPath 2010.
InfoPath 2010 makes our job easier for designing any electronic forms without writing any code by using easy-to-use tools provided out-of-the-box. It also includes the Office UI (Ribbons) for easy access of the controls while designing the forms - an autstanding UI. With a few clicks users can customize SharePoint list forms, add custom layouts and rules to validate the data.
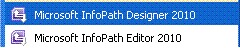
In this version, InfoPath comes with two flavours within the single installation:
1. InfoPath Designer 2010
Designer 2010 comes with a Good User Interface specifically for the designers to design the forms with easy-to-use tools.
Following image shows the Form designed in InfoPath Designer 2010:
2. InfoPath Editor 2010
Editor 2010 comes with a Fluent UI with much improved, simpler user experience for filling out forms.
Following image shows the Form opened in InfoPath Editor 2010:
This is not same case with InfoPath 2007, where we will be doing both the activities in the single tool.
We can consider InfoPath forms for most of the simple form based applications. We can even think about associating an InfoPath form to a SharePoint List.
Please stay tuned to know more about my experiences with InfoPath 2010...
In this post I will be providing a quick overview on InfoPath 2010.
InfoPath 2010 makes our job easier for designing any electronic forms without writing any code by using easy-to-use tools provided out-of-the-box. It also includes the Office UI (Ribbons) for easy access of the controls while designing the forms - an autstanding UI. With a few clicks users can customize SharePoint list forms, add custom layouts and rules to validate the data.
In this version, InfoPath comes with two flavours within the single installation:
1. InfoPath Designer 2010
Designer 2010 comes with a Good User Interface specifically for the designers to design the forms with easy-to-use tools.
Following image shows the Form designed in InfoPath Designer 2010:

2. InfoPath Editor 2010
Editor 2010 comes with a Fluent UI with much improved, simpler user experience for filling out forms.
Following image shows the Form opened in InfoPath Editor 2010:

This is not same case with InfoPath 2007, where we will be doing both the activities in the single tool.
We can consider InfoPath forms for most of the simple form based applications. We can even think about associating an InfoPath form to a SharePoint List.
Please stay tuned to know more about my experiences with InfoPath 2010...
Monday, August 10, 2009
SharePoint Designer 2010 (Technical Preview) Installation Issue
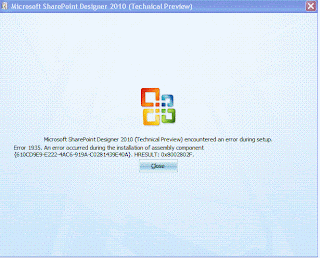
Recently I tried to install SharePoint Designer 2010 to get the early working experience and new features of the product when compared to SPD 2007.
When I am Install SPD 2010 on one of our XP machine, I am getting the following error:
I am still looking on how to fix this issue, if I get any solution I will post it here...
When I am Install SPD 2010 on one of our XP machine, I am getting the following error:

I am still looking on how to fix this issue, if I get any solution I will post it here...
Office Professional 2010 (Technical Preview) Installation Error
Recently I received an invitation from Microsoft to Participate in the Technical Preview Program. As part of this I downloaded Office 2010 Professional Edition.
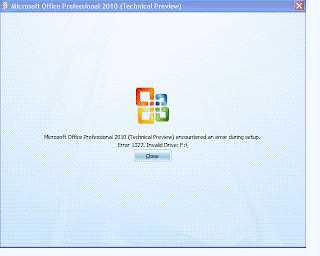
When I tried to upgrade my Office 2003 in one of our XP machine I got the following error message:
"Microsoft Office Professional 2010(TEchnical Preview) encountered an error during setup. Error 1327. Invalid Drive F:\"
Though there was an error during the setup, luckily Office 2010 got installed.
I feel that the error occured while upgrading the office 2003 to 2007, because of that I have both the softwares on machine.
I hope this will be fixed in the actual version of the Office 2010...
I even tried upgrading Infopath 2010 and got the similar error as shown in the following images.

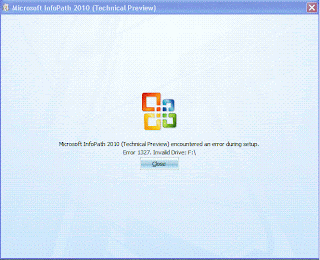
Here also Infopath installed successfully though there was an error during installation/setup.
When I tried to upgrade my Office 2003 in one of our XP machine I got the following error message:
"Microsoft Office Professional 2010(TEchnical Preview) encountered an error during setup. Error 1327. Invalid Drive F:\"

Though there was an error during the setup, luckily Office 2010 got installed.
I feel that the error occured while upgrading the office 2003 to 2007, because of that I have both the softwares on machine.
I hope this will be fixed in the actual version of the Office 2010...
I even tried upgrading Infopath 2010 and got the similar error as shown in the following images.


Here also Infopath installed successfully though there was an error during installation/setup.
Tuesday, August 4, 2009
JQuery to Build Fusion Charts for SharePoint List
This is very much similar to my earlier post "Fusion Charts for SharePoint List" where we used JavaScript for extracting the data from SharePoint List.
Here I will be explaining the similar concept using JQuery. As everyone aware that JQuery is getting very famous and even Microsoft announced that JQuery will be available as part of the Visual Studio 2010 with intellisence too.
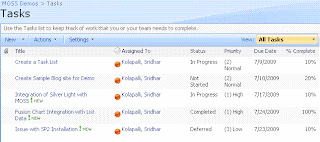
Most of the times our customers expect to develop the charts with no time for preparing lots of dashboards or metrics. Lets consider that we have a Task List with all the tasks assigned to different users and are at the different status like:
1. Not Started
2. In Progress
3. Completed
4. Deferred
5. Waiting for someone else
At this point of time we may get lots of request for building the charts for this list data. I will be concentrating on generating the Pie Chart for Different Status available in this Task List, to identify how many tasks are there at different statuses. Following is the sample image showing the List Data:
Following are the steps to implement the fusion charts:
1. Download Fusion Charts and upload to a document library. In this case I created a separate document library called FusionCharts where all the fusion charts are uploaded.
2. Come up with the RPC Protocol URL for extracting the data from the task list.
In our case following is the URL:
http://localhost/sites/MOSSDemos/_vti_bin/owssvr.dll?Cmd=Display&Query=Status&List=%7B7C6C7072%2D12B5%2D4B05%2D90A4%2D052160CC8F74%7D&XMLDATA=TRUE
Note that we are extracting only the Status field from the Task List.
And the List id is the Task List Guiid within the SharePoint Site.
3. Download JQuery script from the site and upload to the Shared Documents.
4. Copy the following javascript which uses JQuery Script into the content editor web part:
<!-- JScript from shared documents -->
<script type="text/javascript" src="/Shared Documents/jquery-1.3.2.min.js"></script>
<!-- Div tag for appending the graph -->
<div id="divGraph"></div>
<script type="text/javascript">
// Declare all local variables
var iNotStarted = 0;
var iInProgress = 0;
var iCompleted = 0;
var iDeferred = 0;
var iWaitingonsomeoneelse = 0;
var sObjectData = "";
// Call the function once the document is loaded
$(document).ready(function() {
var sSiteUrl = "http://localhost/sites/MOSSDemos/_vti_bin/owssvr.dll?";
// This Parameter Contains List Id too
var sCmdParameters = "Cmd=Display&Query=Status&List=%7B7C6C7072%2D12B5%2D4B05%2D90A4%2D052160CC8F74%7D&XMLDATA=TRUE"
// Ajax call using a JavaScript
$.ajax({
url: sSiteUrl + sCmdParameters,
type: "GET",
dataType: "xml",
data: "",
complete: processResult,
contentType: "text/xml; charset=\"utf-8\""
});
});
function processResult(xData, status) {
//alert(xData.responseXML.xml);
var NS = '#RowsetSchema'
$(xData.responseXML).children(1).children(1).children().each(function() {
var Status = $(this).attr("ows_Status");
switch (Status) {
case "Not Started":
iNotStarted = iNotStarted + 1; break;
case "In Progress":
iInProgress = iInProgress + 1; break;
case "Completed":
iCompleted = iCompleted + 1; break;
case "Deferred":
iDeferred = iDeferred + 1; break;
case "Waiting on someone else":
iWaitingonsomeoneelse = iWaitingonsomeoneelse + 1; break;
default:
break;
}
});
// Create the Object for the Fusion Chart
// Opening Object Tag
sObjectData = "<object classid=\"clsid:D27CDB6E-AE6D-11cf-96B8-444553540000\" ";
sObjectData += "codebase=\"http://download.macromedia.com/pub/shockwave/cabs/flash/swflash.cab#version=6,0,0,0\" ";
sObjectData += "width=\"400\" ";
sObjectData += "height=\"300\" ";
sObjectData += "id=\"Pie3D\"> ";
// Setting Parameters
sObjectData += "<param name=\"movie\" value=\"http://localhost/sites/MOSSDemos/FusionCharts/FusionCharts/FCF_Pie3D.swf?chartWidth=400&chartHeight=300\"> ";
sObjectData += "<param name=\"FlashVars\" value=\"&dataXML=<graph caption='Tasks By Status Percentage' ";
sObjectData += "xAxisName='Site' yAxisName='Qty by Site' showNames='1' decimalPrecision='1' showPercentageInLabel='1' formatNumberScale='0' ";
sObjectData += "pieYScale='70' pieBorderAlpha='40' pieFillAlpha='80' pieSliceDepth='15'> ";
sObjectData += "<set name='Not Started' value='" + iNotStarted + "' color='#660033' link='' /> ";
sObjectData += "<set name='Completed' value='" + iInProgress + "' color='#3399ff' link='' /> ";
sObjectData += "<set name='In Progress' value='" + iCompleted + "' color='#99cc99' link='' /> ";
sObjectData += "<set name='Deferred' value='" + iDeferred + "' color='#00ff99' link='' /> ";
sObjectData += "<set name='Waiting for someone else' value='" + iWaitingonsomeoneelse + "' color='#000033' link='' /> ";
sObjectData += "</graph>\"> ";
sObjectData += "<param name=\"quality\" value=\"high\"> ";
sObjectData += "</object> ";
$("#divGraph").append(sObjectData);
}
</script>
Following are the lines to be changed in the script:
A. Location of the FCF_Pie3D.swf file within the "object" tag.
B. Site Url in the variable "sSiteUrl".
C. Task List Id in the variable "sCmdParameters".
D. Path of the JScript (Assumed it is available in the Shared Documents)
With this, A Pie chart representations the Task Data within the SharePoint List as shown below:

Here I will be explaining the similar concept using JQuery. As everyone aware that JQuery is getting very famous and even Microsoft announced that JQuery will be available as part of the Visual Studio 2010 with intellisence too.
Most of the times our customers expect to develop the charts with no time for preparing lots of dashboards or metrics. Lets consider that we have a Task List with all the tasks assigned to different users and are at the different status like:
1. Not Started
2. In Progress
3. Completed
4. Deferred
5. Waiting for someone else
At this point of time we may get lots of request for building the charts for this list data. I will be concentrating on generating the Pie Chart for Different Status available in this Task List, to identify how many tasks are there at different statuses. Following is the sample image showing the List Data:

Following are the steps to implement the fusion charts:
1. Download Fusion Charts and upload to a document library. In this case I created a separate document library called FusionCharts where all the fusion charts are uploaded.
2. Come up with the RPC Protocol URL for extracting the data from the task list.
In our case following is the URL:
http://localhost/sites/MOSSDemos/_vti_bin/owssvr.dll?Cmd=Display&Query=Status&List=%7B7C6C7072%2D12B5%2D4B05%2D90A4%2D052160CC8F74%7D&XMLDATA=TRUE
Note that we are extracting only the Status field from the Task List.
And the List id is the Task List Guiid within the SharePoint Site.
3. Download JQuery script from the site and upload to the Shared Documents.
4. Copy the following javascript which uses JQuery Script into the content editor web part:
<!-- JScript from shared documents -->
<script type="text/javascript" src="/Shared Documents/jquery-1.3.2.min.js"></script>
<!-- Div tag for appending the graph -->
<div id="divGraph"></div>
<script type="text/javascript">
// Declare all local variables
var iNotStarted = 0;
var iInProgress = 0;
var iCompleted = 0;
var iDeferred = 0;
var iWaitingonsomeoneelse = 0;
var sObjectData = "";
// Call the function once the document is loaded
$(document).ready(function() {
var sSiteUrl = "http://localhost/sites/MOSSDemos/_vti_bin/owssvr.dll?";
// This Parameter Contains List Id too
var sCmdParameters = "Cmd=Display&Query=Status&List=%7B7C6C7072%2D12B5%2D4B05%2D90A4%2D052160CC8F74%7D&XMLDATA=TRUE"
// Ajax call using a JavaScript
$.ajax({
url: sSiteUrl + sCmdParameters,
type: "GET",
dataType: "xml",
data: "",
complete: processResult,
contentType: "text/xml; charset=\"utf-8\""
});
});
function processResult(xData, status) {
//alert(xData.responseXML.xml);
var NS = '#RowsetSchema'
$(xData.responseXML).children(1).children(1).children().each(function() {
var Status = $(this).attr("ows_Status");
switch (Status) {
case "Not Started":
iNotStarted = iNotStarted + 1; break;
case "In Progress":
iInProgress = iInProgress + 1; break;
case "Completed":
iCompleted = iCompleted + 1; break;
case "Deferred":
iDeferred = iDeferred + 1; break;
case "Waiting on someone else":
iWaitingonsomeoneelse = iWaitingonsomeoneelse + 1; break;
default:
break;
}
});
// Create the Object for the Fusion Chart
// Opening Object Tag
sObjectData = "<object classid=\"clsid:D27CDB6E-AE6D-11cf-96B8-444553540000\" ";
sObjectData += "codebase=\"http://download.macromedia.com/pub/shockwave/cabs/flash/swflash.cab#version=6,0,0,0\" ";
sObjectData += "width=\"400\" ";
sObjectData += "height=\"300\" ";
sObjectData += "id=\"Pie3D\"> ";
// Setting Parameters
sObjectData += "<param name=\"movie\" value=\"http://localhost/sites/MOSSDemos/FusionCharts/FusionCharts/FCF_Pie3D.swf?chartWidth=400&chartHeight=300\"> ";
sObjectData += "<param name=\"FlashVars\" value=\"&dataXML=<graph caption='Tasks By Status Percentage' ";
sObjectData += "xAxisName='Site' yAxisName='Qty by Site' showNames='1' decimalPrecision='1' showPercentageInLabel='1' formatNumberScale='0' ";
sObjectData += "pieYScale='70' pieBorderAlpha='40' pieFillAlpha='80' pieSliceDepth='15'> ";
sObjectData += "<set name='Not Started' value='" + iNotStarted + "' color='#660033' link='' /> ";
sObjectData += "<set name='Completed' value='" + iInProgress + "' color='#3399ff' link='' /> ";
sObjectData += "<set name='In Progress' value='" + iCompleted + "' color='#99cc99' link='' /> ";
sObjectData += "<set name='Deferred' value='" + iDeferred + "' color='#00ff99' link='' /> ";
sObjectData += "<set name='Waiting for someone else' value='" + iWaitingonsomeoneelse + "' color='#000033' link='' /> ";
sObjectData += "</graph>\"> ";
sObjectData += "<param name=\"quality\" value=\"high\"> ";
sObjectData += "</object> ";
$("#divGraph").append(sObjectData);
}
</script>
Following are the lines to be changed in the script:
A. Location of the FCF_Pie3D.swf file within the "object" tag.
B. Site Url in the variable "sSiteUrl".
C. Task List Id in the variable "sCmdParameters".
D. Path of the JScript (Assumed it is available in the Shared Documents)
With this, A Pie chart representations the Task Data within the SharePoint List as shown below:

Subscribe to:
Posts (Atom)